Monday, January 30, 2012

Valentine's Day Subway Art

What a crazy day! Today is my sister-in-laws birthday party. All morning I've been scrambling to make the cheesecake I was volunteered for (by my sweet husband) and get her present finished. Now that it's all done and nap time, I decided to take a break and share with you some subway art I did last week for Valentine's Day.

One of my favorite classes in high school was the semester of Graphic Arts I took. It was a super awesome class, and I got to do some awesome projects. Since then I've attempted to do them in word processors since that's all I had. Well, for Christmas I got my hubby Photoshop so he could have more fun with photography, which he loves. You can imagine my excitement when I realized that Photoshop was not just for editing photos, but could be used to make awesome things like subway art, labels, and so much more! 

This is the first time I've ever done subway art, or anything really, that could potentially be framed. So I learned the hard way that you need to leave enough space around the edges for framing. Luckily I had a larger frame and some cool paper to sort of mat it on. Turned out super cute I think! I think they'd make awesome cards too for that special someone. ;) They're formatted for a 5x7 print. My printer was out, so I had one printed at Walgreens to frame. I had to resave my file as a JPEG, so keep that in mind if you decide to have them printed by someone too. Hope you enjoy!!


Here's some pictures of the before and after too! The frame in the picture is the smaller frame that didn't end up working. Instead I used an 8"x10" frame from the dollar store, and painted it with just the red. Then I glued my print to the center of  8"x10" textured scrapbook paper. Fun and super easy!


Linking to:

Friday, January 27, 2012

Shepard's Pie

I'm officially making my Friday's "Food Friday". One of my passions is cooking, and I'd love to share with everyone awesome recipes that I find as well as ones that I've gotten from my family. This particular one is easy and quick to make and is always a crowd-pleaser. It's a family recipe, and I'm not the best recipe writer, so let me know if anything is unclear.

Shepard's Pie
1 pound ground beef (hamburger)
1-2 cups thick spaghetti sauce*
4 potatoes
milk
butter
salt & pepper
dash of paprika
2 cans green beans, drained
1-2 cups shredded cheddar cheese

Preheat oven to 350 degrees.

Brown the hamburger in a medium sized skillet over medium heat. Turn off the heat and drain fat. Add the spaghetti sauce, starting with the smaller amount, and stir to combine. Add additional sauce if necessary.

Meanwhile, peel and dice potatoes. Add to a pot with enough cold water to cover the potatoes by at least an inch. Bring the water to a boil over high heat. Add a sprinkle of salt to the boiling water, and cook potatoes until tender. Drain off all water making sure to get off any excess water. Return the potatoes to the pot. Make mashed potatoes by adding desired amount of milk, butter, salt, pepper, and a dash of paprika. I like to mix mine with a hand mixer for a thick and smooth consistency. If you prefer a chunkier mash, a potato masher will work fine.

Transfer the hamburger mixture to a 9"x9" baking dish. Top with green beans and spread evenly. Carefully top the green beans with mashed potatoes. Sprinkle shredded cheese on top in desired thickness. Bake in oven for 30 minutes, making sure cheese has thoroughly melted. Let cool for a few minutes and then serve.

*We use a homemade jarred spaghetti sauce. You really only need enough sauce to coat the hamburger and keep it from drying out in the oven. It also adds some good flavor so I don't recommend omitting it. If you only have a store bought or thinner sauce, start off with a smaller amount.

Wednesday, January 25, 2012

Mommy on the Go Pouch

When Xavier was little, I always had a little kit in my purse for little emergencies while I wasn't home. I think I probably used it more for me and stranger's children than I actually did for him, but it was still a nice thing to have. Somewhere along the line the pouch got worn and dirty and the snap stopped working as well. One by one things were lost as they slipped out into the mysterious beyond which is my over-sized purse. Ah what a sad, sad day.

Now that Xavier has grown into a very active and accident prone little boy, and will soon have a little brother, I figured it was probably time to make a new and improved version. I loved the original, but wanted to make some adjustments to fit my personal needs a little better. (Some things are still missing!)


Isn't it darling? It took me about an hour to sew the bag, and I didn't follow any specific instructions. I was in a "get it done now" mood, and didn't want to take the time to look up a tutorial. Luckily it still somehow turned out. If you want an awesome tutorial on how to make basically the same bag, hop on over to this blog HERE. Whether you can sew or not, definitely check out her shop too. I love her stuff.

Now back to what's on the inside. Like I mentioned earlier, there are still some things missing that I'd like to include. Some things you may not feel are necessary to carry around, but I like to have them on hand.

What's Inside (and what will - or won't -be!)

♥ Kleenex -- Allergies, colds, little noses.. Need I say more?
♥ Q-tips -- Honestly, I could live without these, but sometimes they're just nice to have.
♥ Mini Lotion -- My hands dry out easily, especially from soaps in public restrooms. There's nothing I hate more than over dry and irritated hands and not having a way to relieve them.
♥ Tums -- Any antacid would work here. 
♥ Antibacterial hand wipes -- If you have kids, these are practically a necessity. They're cheap too.
♥ Band-aids -- Cuts and scrapes can happen anywhere, and band-aids always help boo-boos feel better. (Especially ones with their favorite t.v. characters)
♥ Neosporin or Neo-to-go -- I'm really not a fan of Neo-to-go. It's difficult to spray a scrape on little people and not get it all over where the band-aid needs to stick too. Love the idea, but not the application. I'll be sticking to the original.
♥ Infants Acetaminophen (tylenol) -- I've been away from home a few times when Xave came down with a fever or bug and I was really glad I had some in his diaper bag. Saved us both a lot of misery.
♥ Chapstick -- I'm still debating whether or not I really need to go get more chapstick, but for someone who doesn't carry this regularly, go for a medicated one for sudden chapped or wind burned lips.
♥ Lactaid -- Not many people need to include this. Xavier is lactose-intolerant, so these tablets are nice to have especially when we're on the go and I can't guarantee there will be a dairy-free option.
♥ Tide-to-go -- This was in the original pouch, but I won't be including it in my new one. I have family that swear by these, but I never found them useful and the cap always came off while it was in my purse. 

There are some newer carry-size products I've heard of that I don't have listed here because I need to look into them more. If there's anything you definitely wouldn't want to leave the house without, let me know! I love hearing about new things that can make my life easier, or my kids' lives too!

Monday, January 23, 2012

Chile Lime Chicken

My husband is a Crossfit trainer, and firm believer in the Zone Diet. I'm still trying to figure out how to fine tune it to my personal likes and preferences, but I try to come as close to it as best I can when cooking for him. When he came across this recipe in the Crossfit Journal, I was more than happy to test it out. Chili Lime Chicken is one of my favorite things to order on the rare occasion we make it to an Applebee's, and I love finding recipes to make things at home.

The journal features a brief summary of the video which can be viewed by anyone, but the video, which includes great tips and a thorough demonstration of how to prepare this meal, is only available for subscribers. There is another recipe for a stir fry to serve with this meal, but I tried this Cilantro rice recipe instead. It wasn't much more work than making plain rice. The picture shows a yellow rice, but mine came out a greenish color. My rice loving boy almost wouldn't eat it because he thinks green is not an appetizing color unless it's on broccoli or lettuce.

I hope you enjoy this simple recipe! Let me know how yours turns out and what kinds of sides were successful with it. This is one of my husbands new favorites, so I'm sure I'll be making it quite often. I also encourage you to check out the journal for some of Massie's other recipes!


Chili Lime Chicken
Recipe from Cooking with Nick Massie feautured on the Crossfit Journal

Salt
Pepper
Finely Ground Red Pepper Flakes
Chili powder
1/3 cup Olive oil
Zest of 3 limes
1/2 bunch of cilantro, stems removed and finely chopped
1/2 head of garlic, peeled and finely chopped
2 whole chickens, halved (or 4 chicken halves)

Preheat oven to 350 degrees.

Begin by seasoning both sides of the chicken halves with salt, pepper, ground pepper flakes, and chili powder. Pour olive oil over both sides of the chicken halves. Next sprinkle the zest, cilantro, and garlic over both sides of the chickens. It may be necessary to redistribute these ingredients with your hands for an even distribution. Add more chili powder on top to lightly coat.

Heat a few tablespoon of olive oil in two large saute pans over medium high heat. Add two chicken halves to each pan, breasts down.  Cook until golden brown, about 7 minutes. Some of the toppings may slightly char, and is normal. Flip the chicken halves over and cook an additional 3 minutes.

Place a cooling rack in a wide roasting pan. Transfer the chicken to the cooling rack. This allows additional fat and juices to drip away from the chicken. Cook the chicken in a preheated oven for 30 minutes. Rotate the pan and cook for an additional 15 minutes. Using a meat thermometer, check that a proper temperature of 165 degrees has been reached in the thickest part of one of the halves. If the proper temperature has been reached, cover with aluminum foil and let rest for 10 minutes. Serve whole halves, or cut into smaller portions if desired.

Friday, January 20, 2012

Slow Cooker Pork Tacos

Don't you just love a meal that slaves away all day for you and then makes you look like a hero? This is definitely one of those dishes. I was a little skeptical at first, but they turned out incredible!

Slow Cooker Pork Tacos 
adapted recipe from Food Network Magazine

3 dried whole ancho chiles
4 cloves garlic, peeled
1/2 medium onion, roughly chopped
3 tablespoon extra virgin olive oil
2 tablespoon honey
1 tablespoon apple cider vinegar
Kosher salt
2 teaspoons dried oregano
3 3/4 cups chicken broth
4 pounds pork shoulder, cut into chunks
Freshly ground black pepper
2 bay leaves
1 cinnamon stick or 1/4 teaspoon ground cinnamon
Flour
Corn tortillas, warmed for serving
Taco toppings (beans, lettuce, cilantro, sour cream, olive, salsa, etc.)

Reconstitute the dried ancho chiles by soaking them in hot water for about 10 minutes. Place a bowl or other heavy object on top of them to keep them submerged, if needed.
When softened and pliable, remove the stem and seeds from the chiles.

Add the ancho chiles, garlic, onion, 2 tablespoons olive oil, honey, vinegar, and 1 tablespoon salt, and oregano to the blender. (If using ground cinnamon add it to the blender now.) Puree until smooth. Heat remaining oil in a large skillet over high heat. Add the blended mixture and cook until thickened and fragrant. Add the chicken broth and reduce until slightly thickened.

Season the pork on all sides with salt and pepper and place it in the slow cooker. Add the bay leaves and cinnamon stick, and then the sauce. Cook on low for approximately 8 hours or on high for 5 hours.

Discard the bay leaves and cinnamon stick. Strain the meat, using a slotted spoon, into another dish and shred using 2 forks. Remove several cups (about 4 cups, or more if you want more sauce) of the sauce from the slow cooker to a saucepan. Place over medium heat and add a few spoonfuls(about 2-4 tablespoons) of flour to help it thicken. Whisk thoroughly to combine. Stir frequently until sauce has reduced and thickened. Add the shredded pork to the sauce pan. Warm tortillas in a preheated oven or microwave. Serve the shredded pork mixture with the tortillas and desired toppings.

Wednesday, January 18, 2012

Snow Day!

Wow! This new year has been crazy! I honestly cannot believe how much of the month has already gone by. This has been one of those time in life where you've got so much going on, that suddenly a few weeks have gone by, and when you get a second to look around you can't believe your eyes. Well, that moment really came for me today when we woke up to 5 or 6 inches of snow and more coming down hard. It's kind of nice to have a day off from the craziness of life and just do what I want to, not what I think I have to. ;)

As you can imagine, from the second our 3 year old saw there was snow, there was a hyper frenzy until we could go out in it. So we all got our our hats and boots and ventured on out. This is the first time it's really snowed and he hasn't been scared of it, so we built a snow man, made snow angels, and had a playful (and gentle!) snow ball fight. And who could pass up a perfectly good excuse for some hot cocoa? So when we came in to warm up, we did that too. Here's some pictures of our fun. Hope you enjoy!


What kinds of fun are you having (or not having) with all the snow? Are you wishing for snow, or just wishing it would go away?

Monday, January 2, 2012

Anise Biscotti

I am absolutely in love with this basic biscotti recipe! (Obviously!) I really wanted a third variation, but was running out of creative ideas. I had a few leftover pecans from making candies, so I decided to do an anise biscotti and throw them in too. These had a really light, delicate flavor and were the favorite among my extended family. Clean and simple is just better sometimes! I'm sure these would taste great without the pecans too if you're not a fan of nuts.


The ones in the upper right hand corner are the Anise biscotti. Unfortunately this is the only picture I got of them. I decided to keep the chocolate decoration simple, like the biscotti's flavor, and just drizzled them with some milk chocolate. Dipping them would be pretty too, and you could add chopped pecans to the top as well. Chocolate is not a necessary addition, but makes them look pretty and it's kind of fun!

Anise Biscotti
(Adapted from Brown Eyed Baker)

1/2 cup (1 stick) butter, softened
1 cup granulated sugar
2 large eggs
1/2 teaspoon vanilla
1/2 tsp anise extract 
2 3/4 all purpose flour
1 teaspoon baking powder
1/2 teaspoon salt
1 cup finely chopped pecans

Preheat oven to 375F.

Cream the butter and sugar together until fluffy. Add the eggs on at a time, beating well after each addition, and then add the extracts. Whisk together the flour, baking powder, and salt in a separate bowl. Add the flour mixture to the creamed mixture and mix until almost combined. Add thepecans and mix until well incorporated and the dough begins to pull away from the sides of the bowl.

Turn the dough onto a lightly floured surface, and rub a little flour on your hands. Divide the dough in two equal pieces and shape each into a log approximately 4 inches wide and 10 inches long. Bake on parchment lined baking sheets until lightly brown and small cracks form, about 25 minutes. Remove from oven and let cool slightly. Transfer the logs to a cutting board. Slice on the diagonal in 1/2" slices using a very sharp kitchen knife. Place them back on the trays with the cut side up. Bake for another 16-20 minutes until lightly browned, turning over half way through baking. Transfer to a wire rack and let cool completely.

Orange Almond Biscotti

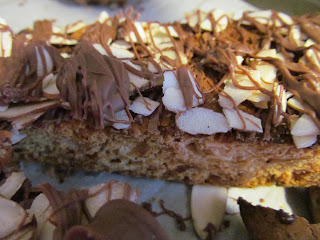
Orange and almond is the flavor combination I usually stick with every year when I make biscotti. Each time I've made it, I've changed the ingredients slightly. I would typically add anise, but have found in the past that it overpowered the orange and almond flavors. I decided to leave it out this year and love how these turned out. You can really taste the orange and the almond adds a delicate background flavor. I got a little distracted while I was baking them, and they browned a little farther than I would have liked, but they still turned out awesome, and I just covered up the over browned bottom with chocolate. I hope you enjoy!


I love how these ones turned out! I didn't have a bowl big enough to dip these in since I was melting the chocolate in the microwave. Instead I drizzled them with milk chocolate, sprinkled on some sliced almonds, and then drizzled some more chocolate on the top to help the almond stick. Some people may not like dipping these in cocoa (or coffee) because of the nuts, but they make a great snack too!

Orange Almond Biscotti
(Adapted from Brown Eyed Baker)

1/2 cup (1 stick) butter, softened
1 cup granulated sugar
2 large eggs
1 teaspoon orange extract
Zest of 1 orange
2 3/4 all purpose flour
1 teaspoon baking powder
1/2 teaspoon salt
6 ounces almonds, chopped or sliced

Preheat oven to 375F.

Cream the butter and sugar together until fluffy. Add the eggs on at a time, beating well after each addition, and then add the extract and zest. Whisk together the flour, baking powder, and salt in a separate bowl. Add the flour mixture to the creamed mixture and mix until almost combined. Add the almonds and mix until well incorporated and the dough begins to pull away from the sides of the bowl.

Turn the dough onto a lightly floured surface, and rub a little flour on your hands. Divide the dough in two equal pieces and shape each into a log approximately 4 inches wide and 10 inches long. Bake on parchment lined baking sheets until lightly brown and small cracks form, about 25 minutes. Remove from oven and let cool slightly. Transfer the logs to a cutting board. Slice on the diagonal in 1/2" slices using a very sharp kitchen knife. Place them back on the trays with the cut side up. Bake for another 16-20 minutes until lightly browned, turning over half way through baking. Transfer to a wire rack and let cool completely.

Pistachio and Dark Chocolate Biscotti

One of my favorite things about Christmas the past few years has been making biscotti to give away as gifts, and enjoy with a cup of hot cocoa. I like to try out different flavor variations and the basic recipe from Brown Eyed Baker is perfect for that! She also has some other great variations I will be trying at sometime in the near future, but wanted to make my own for Christmas. She also has a Chocolate Pistachio Biscotti, but I'm not a big fan of chocolate cookies, so I decided to tone it down by just adding some chocolate pieces to the dough. I also love the flavor of anise in almost any kind of biscotti, but it's completely optional. My little helper dumped in more than is called for here while I wasn't looking, so ours was extra licorice-y. It still seemed to compliment the other flavors well. Check out the Brown Eyed Baker for other great recipes too! She's one of my favorite resources for spectacular, and often fairly simple to make, meals and desserts. Happy cooking!


Aren't they purdy? I loved how these ones had little specks of green from the pistachios, and the pistachios on top helped the flavor stick out. These seemed to be my husbands favorite and we had a hard time staying out of them. For these I drizzled a mixture of half dark chocolate and half milk chocolate over the tops. Then I sprinkled on some chopped pistachios and drizzled some more chocolate. Honestly, who doesn't love MORE chocolate? ;)

Pistachio and Dark Chocolate Biscotti
(Adapted from Brown Eyed Baker)

1/2 cup (1 stick) butter, softened
1 cup granulated sugar
2 large eggs
1/2 teaspoon vanilla
1/2 tsp anise extract (optional)
2 3/4 all purpose flour
1 teaspoon baking powder
1/2 teaspoon salt
5 ounces shelled unsalted pistachios, finely chopped (I bought salted and roasted shelled pistachios, shelled them by hand and then rinsed them and it turned out great)
5 ounces finely chopped dark chocolate

Preheat oven to 375F.

Cream the butter and sugar together until fluffy. Add the eggs on at a time, beating well after each addition, and then add the extracts. Whisk together the flour, baking powder, and salt in a separate bowl. Add the flour mixture to the creamed mixture and mix until almost combined. Add the pistachios and chocolate and mix until well incorporated and the dough begins to pull away from the sides of the bowl.

Turn the dough onto a lightly floured surface, and rub a little flour on your hands. Divide the dough in two equal pieces and shape each into a log approximately 4 inches wide and 10 inches long. Bake on parchment lined baking sheets until lightly brown and small cracks form, about 25 minutes. Remove from oven and let cool slightly. Transfer the logs to a cutting board. Slice on the diagonal in 1/2" slices using a very sharp kitchen knife. Place them back on the trays with the cut side up. Bake for another 16-20 minutes until lightly browned, turning over half way through baking. Transfer to a wire rack and let cool completely.