

Friday, March 23, 2012
Time for some rest..
I've managed to disappear for a few days again. I got home Wednesday night feeling pretty icky, and I have a full blown cold. It's taken any energy the pregnancy hadn't already, and it's made me realize I need to slow down a little. After a very long and hard debate with myself, I've decided to take a break from here until after the baby is born. There just isn't enough in me to be here and with my family, and they're much more important. (Sorry!) Hopefully I'll be back here soon with some new found energy and lots of fresh perspective and new ideas. Until then, I hope you'll understand my temporary leave. Can't wait to get back! :)


Tuesday, March 20, 2012
We're getting Sealed today!!
I'm so super excited! By the time this posts, my sweet husband and I will have been sealed in the Portland LDS Temple! We celebrated our one year wedding anniversary over the weekend, and this moment has been long awaited. Unfortunately I didn't get to wear my wedding dress again because I'm ready to pop, so we got a cute outfit and will have to take some awesome maternity pictures instead. :)
Tomorrow is another doctor's appointment and I'm really hoping things will get moving along soon. Hopefully I'll be in the hospital having a baby and you won't hear from me again tomorrow, but I'm not going to count on that... Please pray that you won't. ;)
Anyway, I hope you're enjoying your week! Just wanted to share the exciting new with you. I'll post pictures and a little more about the day soon. :)
Tomorrow is another doctor's appointment and I'm really hoping things will get moving along soon. Hopefully I'll be in the hospital having a baby and you won't hear from me again tomorrow, but I'm not going to count on that... Please pray that you won't. ;)
Anyway, I hope you're enjoying your week! Just wanted to share the exciting new with you. I'll post pictures and a little more about the day soon. :)
Monday, March 19, 2012
"Yes, You Look Beautiful" {Printable}
Over the weekend I was cleaning out my jewelry box after my sweet boy had demolished it several times. Apparently he thought it was a toy box or something and had horribly tangled and mixed up everything. While I was sorting out the mess, I found a little magnet that I got with some sort of clothing order a long time ago. It's simple and sweet with a powerful message, "Yes, you look beautiful." It made me smile so I pulled it out where I could see it every day.
Looking at the magnet a few minutes later I realized how much we need the reminder sometimes that yes, we DO actually look beautiful no matter how much the world tries to tell us we don't. I wanted other women, and girls of all ages, to be able to have that power to say I am beautiful with a daily reminder to themselves too. So I created some simple and fun printables to share! Just print it off and tape it to the bathroom mirror or somewhere else you'll see it at least a day. :)


I got the font for these cute printables from Kevin and Amanda! How awesome are they?

Linking to:
Destination: Craft ♡ Skip to my Lou ♡ Polly Want a Crafter ♡ Lines Across My Face ♡ Sumo's Sweet Stuff
Looking at the magnet a few minutes later I realized how much we need the reminder sometimes that yes, we DO actually look beautiful no matter how much the world tries to tell us we don't. I wanted other women, and girls of all ages, to be able to have that power to say I am beautiful with a daily reminder to themselves too. So I created some simple and fun printables to share! Just print it off and tape it to the bathroom mirror or somewhere else you'll see it at least a day. :)








I think these would be an awesome handout for young women or even as a gift to a friend. Just laminate a page of them, cut 'em out, and spread the love. They'll last longer that way too. :)
I got the font for these cute printables from Kevin and Amanda! How awesome are they?
Linking to:
Destination: Craft ♡ Skip to my Lou ♡ Polly Want a Crafter ♡ Lines Across My Face ♡ Sumo's Sweet Stuff
Friday, March 16, 2012
Food Friday: Pepperoni Meatball Sub Sandwiches
Did you notice that Subway recently introduced these as their newest sandwich? When I saw the commercial for them I kinda giggled to myself because my husband would always get the meatball sub and ask them to add pepperoni. He recently asked if I could make them for dinner, and they turned out super awesome! I'm not usually a big meatball fan, but these were great and super easy. Try the meatballs with spaghetti too, you won't be sorry. :)
Pepperoni Meatball Sub Sandwich
1 batch of meatballs sliced in half (recipe follows)
1 can of your favorite marinara sauce (or 2 cups of homemade sauce), heated
1-2 packages hoagie sandwich buns, or desired sandwich bread (french bread "subs" would be awesome!)*
1 package pre-cooked pepperoni
1 can sliced olives, optional
Parmesan cheese, optional
Begin assembling the sandwiches by placing a layer of pepperoni along the bottom piece of bread.
Add a layer of olives if desired.
Next, place as many meatball halves as will fit side by side (about 3 or 4 on a normal hoagie) on top of the pepperoni and olives if using.
Ladle the heated sauce over the meatballs.
Sprinkle on some parmesan or shredded mozzarella, and top with the top piece of bread.
Now EAT!
*If you like your bread toasted, spread some butter on the insides and place under the broiler for a few minutes before assembling your sandwich.
Italian Meatballs
Recipe Adapted from Big Jim's Meatballs on Food Network.com
1 pound ground beef
1 pound ground pork
2 eggs, slightly beaten
1 cup Italian seasoned breadcrumbs
1 TB garlic powder
1 1/2 TB Italian seasoning
1 teaspoon salt
1 teaspoon pepper
1/4 cup grated parmesan
Preheat oven to 400 degrees F.
Mix all ingredients in a bowl with hands until well mixed. Shape the mixture into meatballs about the size of golfballs. Place in a greased baking dish and cover with aluminum foil. Bake in the preheated oven for 25 minutes. Remove from oven, and check to make sure they're thoroughly cooked. Return to the oven uncovered for another 10 minutes until lightly browned. Remove from oven, and allow the meatballs to rest (sit on the counter/stove) for 15 minutes. Drain remaining grease and serve as desired.
Have a fantastic weekend! :)
Pepperoni Meatball Sub Sandwich
1 batch of meatballs sliced in half (recipe follows)
1 can of your favorite marinara sauce (or 2 cups of homemade sauce), heated
1-2 packages hoagie sandwich buns, or desired sandwich bread (french bread "subs" would be awesome!)*
1 package pre-cooked pepperoni
1 can sliced olives, optional
Parmesan cheese, optional
Begin assembling the sandwiches by placing a layer of pepperoni along the bottom piece of bread.
Add a layer of olives if desired.
Next, place as many meatball halves as will fit side by side (about 3 or 4 on a normal hoagie) on top of the pepperoni and olives if using.
Ladle the heated sauce over the meatballs.
Sprinkle on some parmesan or shredded mozzarella, and top with the top piece of bread.
Now EAT!
*If you like your bread toasted, spread some butter on the insides and place under the broiler for a few minutes before assembling your sandwich.
Italian Meatballs
Recipe Adapted from Big Jim's Meatballs on Food Network.com
1 pound ground beef
1 pound ground pork
2 eggs, slightly beaten
1 cup Italian seasoned breadcrumbs
1 TB garlic powder
1 1/2 TB Italian seasoning
1 teaspoon salt
1 teaspoon pepper
1/4 cup grated parmesan
Preheat oven to 400 degrees F.
Mix all ingredients in a bowl with hands until well mixed. Shape the mixture into meatballs about the size of golfballs. Place in a greased baking dish and cover with aluminum foil. Bake in the preheated oven for 25 minutes. Remove from oven, and check to make sure they're thoroughly cooked. Return to the oven uncovered for another 10 minutes until lightly browned. Remove from oven, and allow the meatballs to rest (sit on the counter/stove) for 15 minutes. Drain remaining grease and serve as desired.
Have a fantastic weekend! :)
Wednesday, March 14, 2012
Boy's Play Area Ideas
Is it really already Wednesday? It's hard to believe this week is already half over. I spent a few hours in the ER on Sunday. I still was feeling awful on Monday and exhausted from the late night, but I'm feeling much better after a few days of medicine.
Yesterday we had an ultrasound and doctor appointment to check on our little guy's weight. 36 weeks and he's already an estimated 7 pounds and 11 ounces! I was terrified that might be a little too big, but I get to continue to try for a VBAC. Yay! (My first was a cesarean and weighed 11 pounds, 5 ounces. I make big babies..) Hopefully he'll either come a little early or not grow too quickly in the next few weeks. I really don't want to go through another c-section and the long recovery that follows.
As many of you can imagine, I'm starting to feel the effects of late pregnancy and tire quickly, so I haven't done a lot of projects lately. I've got a few to share in the next few weeks, I just need to get everything put together. Right now we're trying to get a reading and play area set up for Xavier, and I think it's going to be awesome. My hubby is working on making a reclaimed wood bookshelf from old decking. I really can't wait to see the end result and share that with you too! I've been trying to find some inspiration for the decor at local thrift stores with little luck. Instead I turned to blogland and my favorite stores to inspire me with your brilliance. Here's some of my favorites. :)



Yesterday we had an ultrasound and doctor appointment to check on our little guy's weight. 36 weeks and he's already an estimated 7 pounds and 11 ounces! I was terrified that might be a little too big, but I get to continue to try for a VBAC. Yay! (My first was a cesarean and weighed 11 pounds, 5 ounces. I make big babies..) Hopefully he'll either come a little early or not grow too quickly in the next few weeks. I really don't want to go through another c-section and the long recovery that follows.
As many of you can imagine, I'm starting to feel the effects of late pregnancy and tire quickly, so I haven't done a lot of projects lately. I've got a few to share in the next few weeks, I just need to get everything put together. Right now we're trying to get a reading and play area set up for Xavier, and I think it's going to be awesome. My hubby is working on making a reclaimed wood bookshelf from old decking. I really can't wait to see the end result and share that with you too! I've been trying to find some inspiration for the decor at local thrift stores with little luck. Instead I turned to blogland and my favorite stores to inspire me with your brilliance. Here's some of my favorites. :)
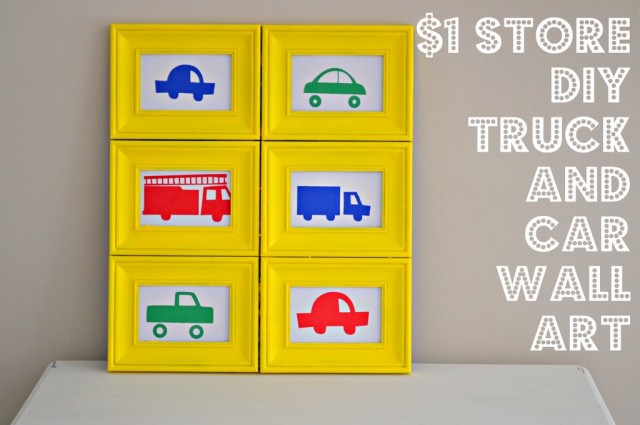
{Dollar Store DIY from Ashely @ Little Miss Momma}
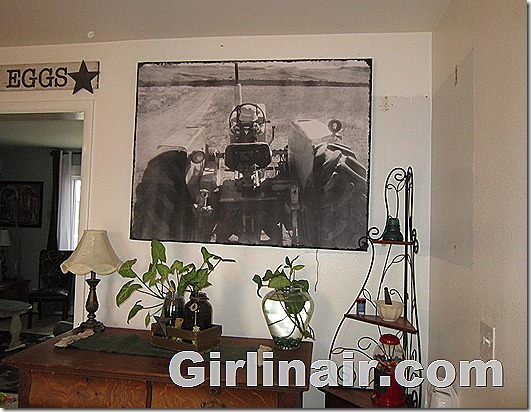
{DIY Giant "Canvas" Print from Michell @ Girl in Air}

{Framed Kite Art from Nat and Holly @ My Sister's Suitcase}

{Fabric Storage Boxes from Ashley @ Make it and Love it}

{Happy Day Garland from Dana @ MADE}

{Pinwheel tutorial from Victoria @ A Subtle Revelry}

{Mini Paper Lanterns @ Polka Dot Market}


{Mission Printable from Tami @ The Family: A Proclamation to the World}
I've got all my creative juices really flowing on this one! You are all so full of awesome ideas, and it's going to be hard for me to narrow it down and pinpoint exactly what I want to use for his fun corner. Hopefully we'll have a house soon and then I can really go nuts on an entire room. Until then, hopefully you can find some inspiration from my collection for your little guy (or gal!) too. :)
Have a wonderful day! Spring is just around the corner and it's time for me to get out and play a little. Enjoy the sun if you're lucky enough to have it too. :)
Friday, March 9, 2012
Food Friday: Chicken Farfalle Salad

Chicken Farfalle Salad
3-4 chicken breasts
1 16 oz box farfalle pasta (bow-tie pasta)
3/4 bag of pre-washed baby spinach
1 16 oz bottle Caesar dressing
1 wedge Parmesan cheese grated, or a small tub of freshly grated (NOT the green can powdered kind)
Heat some olive oil in a large frying pan over medium heat. Add the chicken and season as desired. I usually use a sprinkling of salt, pepper, garlic powder, and a little paprika. (Use salt and pepper at the very least.) Cook chicken 5-10 minutes until light golden brown, and flip it to the other side. Season this side and cook for an additional 5-10 minutes until light golden brown, ensuring the chicken has cook thoroughly. Once chicken is cooked through, transfer to a cutting board and allow to cool slightly. Once cooled, cut into bite sized pieces.
While the chicken is cooking, bring a large pot of water to a boil. Salt your water and add the pasta. Cook according to package directions. Drain the pasta and transfer to a large bowl. At this point you can add a little olive oil and toss to prevent sticking, but I usually do not. Place the chicken in the bowl with the pasta and cover with plastic wrap. Refrigerate the pasta and chicken until the pasta has cooled, about half an hour.
Once the pasta and chicken have been refrigerated for at least a half hour, you can finish mixing the salad. Remove the plastic wrap and add the baby spinach and about 3/4 of the bottle of dressing. Stir to combine. Add additional dressing as needed, and more spinach if desired. Add the grated cheese and stir until well mixed. Transfer it back to the fridge for an additional half hour or until ready to serve. Enjoy!
I hope everyone has a wonderful weekend! We're finally enjoying the sun a little bit here after some snow earlier this week. I'm hoping it's here to stay. Thanks for stopping by! Happy cooking. :)
Linking to:
Tatertots and Jello ♡ Family Ever After ♡ Mommy By Day, Crafter By Night ♡ Lil' Luna ♡ Sumo's Sweet Stuff ♡ Somewhat Simple ♡ WhipperBerry
Wednesday, March 7, 2012
"Hopeless Romantic" Bib Necklace
Happy Wednesday everyone! I found out on Saturday that I did not make it into Round 3 for the Creative Bloggers Got Talent competition. I was up against some pretty talented ladies, and I'm happy they'll get to continue to compete. This morning I also found out I was not selected for the Sewvivor competition either, but I did receive an honorable mention which was awesome. :) I will definitely be stopping by to vote for both, and will probably enter if they host these competitions again. Congrats to everyone who is competing! I wish you the best of luck!
Honestly, now I can breathe a sigh of relief! I was a little crazy for entering with a baby due in a few weeks. Now I don't have to worry about stockpiling projects just in case. :)
Now that the Round 2 Winners have been announced, I can share the project I entered with you! My original idea was to do a cute ruffled skirt, but my sewing machine was not cooperating (it's on it's last leg...), and I decided I just didn't want to mess with it. I switched gears and tried something new! I've made several flower headbands in different styles, but wanted to use them in a different way. A while back I saw some really cute bib necklaces, and thought that would be a fun thing to do. Here's what I came up with. :)

I messed around and created a variety of flowers in coordinating colors from my fabric stash. (Sorry there's no pictures of the process. It was late, I was tired, and just wanted it DONE. If anyone would like, I may create a full tutorial in the future.)
Next I took a piece of paper and created some templates until it was about the size I liked, and cut out a felt shape to match.
Here comes the fun part! I rearranged the flowers on the felt until I liked the way they looked, and added embellishments like pearls, feather boa, bows, and french netting.
Once I was happy with the way everything looked, I pulled out my handy dandy glue gun and started gluing everything in place.
Then I took some velvet ribbon and cut out 2 straps for the necklace part. I glued them to the back of the felt.
Just to make sure everything stayed in place and held up well, I cut out another piece of felt a little larger than the first and glued it to the back as well.
I'm pretty satisfied with the way it turned out, and think its a lovely new accessory.

This is something I'll have to play around with more, and maybe explore some different materials and looks. I think bib necklaces are a cute way to add some fun to any outfit, and I'm glad I finally got around to making one. Congrats again to the contestants that moved on in both rounds! I look forward to seeing what you come up with next. Have a great day everyone! :)
Linking to:
Skip to my
Lou ♡ Polly Want a Crafter ♡ Lines Across My Face ♡ Sarahndipities ♡ Sumo's Sweet Stuff ♡ Vintage Wanna Bee ♡ Not Just a Housewife ♡ Oopsey Daisy ♡ My Girlish Whims ♡ Blue
Cricket Design ♡ Someday Crafts ♡ Lil' Luna ♡ Southern Lovely ♡ 733 ♡ Sew Much Ado ♡ The Trendy Treehouse ♡ Junk in Their Trunk ♡ Polka Dots on Parade
Subscribe to:
Posts (Atom)